In this post, you will learn how to Voronoi any mesh using steps that I found from this video:
i. Blender (http://www.blender.org/download)
ii. Meshlab (http://sourceforge.net/projects/meshlab/files/meshlab/MeshLab%20v1.3.2/)
1. Import your stl into Meshlab.
(Note: Meshlab lets you import other files than stl's, however stl is the format that I personally prefer to work with.)
2. Look at the number of faces your and vertices your object has. This can be found at the bottom of your Meshlab window.

These values seem to produce an adequate effect for what I have hoped to achieve in the past. If you have run this tutorial and you have problems, or it's not coming out as nice as you'd like, you may have too few faces. To solve this, open up Blender.
1. Import your stl

2. Change from Object Mode to Edit Mode

3. Hit 'A' On your keyboard to deselect everything, then hit 'B' to select the vertices of the faces you wish to subdivide. look in your mesh tools menu (on the left) and click subdivide. After getting a fairly equal subdivision across the surface of your mesh, you are ready to move on to working with Meshlab.

4. Open up Meshlab, and go to File -> Import Mesh.
5. Once the mesh is imported, click on Filter -> Sampling -> Poisson-disk Sampling the values that I've used seem to work alright for imputting the number of vertices divided by 50, but for the moment, my numbers are mere conjecture for what might actually be the best method. More experimentation needs to be done.

6. Click the button that allows you to see all of the created layers at the top of Meshlab. (It looks like the one in the grey picture)

7. Next click the .stl file that you are wanting to add the Voronoi effect to.

8. Go to Filters -> Selection -> Select Faces by Vertex Quality. I believe setting both of the sliders to a relatively low number should give nice results, but as stated earlier, more experiments need to be done in order to produce proper information regarding the appropriate settings.

9. Go to Voronoi -> Sampling -> Voronoi Vertex Coloring.

10. Go to Filters -> Selection -> Invert Selection.

11. Go to Filters -> Selection -> Delete Selected Faces and Vertices (Note, this command can also be found at the top right corner of Meshlab's screen)

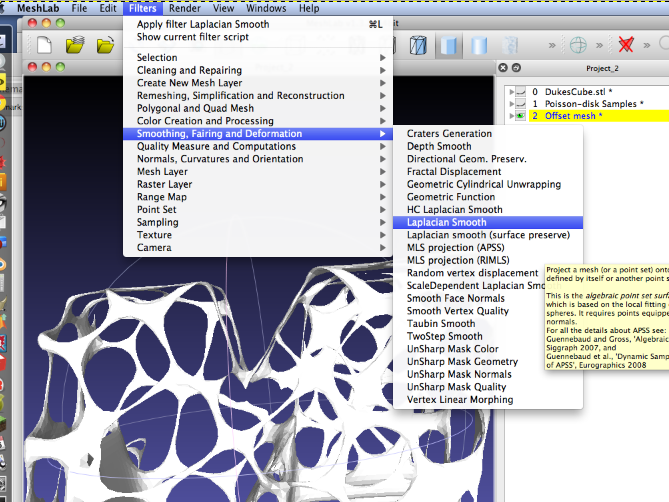
12. Go to Filters -> Smoothing, Fairing, and Deformation -> Laplacian Smooth. This will take away the chunky looking mesh that this process will have produced for you.
 13. (Optional) You may want to go to Filters -> Remeshing, Simplification, and Reconstruction -> Uniform Mesh Resampling. (This is done to simplify your object so that it doesn't have as many faces. This is useful because Meshlab tends to crash a lot so having a simple model seems to be a nice way to go.
Hopefully this has helped out, again, if you were lost or there wasn't enough information found here, check out the video that taught me the process for accomplishing the task (the link is found at the top of the page).
Very nice! I'll try with some models :)
ReplyDelete